UPDATE 13 Jan 2021: OBS Studio 26.1 for Mac has since added a built-in virtual webcam, which means you no longer need to install the extra plugin. If you have already set up OBS with the plugin, you must remove the plugin.
For better or worse, the piano keyboard informs a lot of my teaching, and having a way to show a keyboard in realtime on Zoom has been something I’ve been trying to work out since we were exiled from campus back in March. Most of the pieces needed to make this happen have existed for a while, but it’s only in the last few weeks and months that they’ve been updated to make connecting them together relatively1 easy and reliable.
Here’s our end goal.
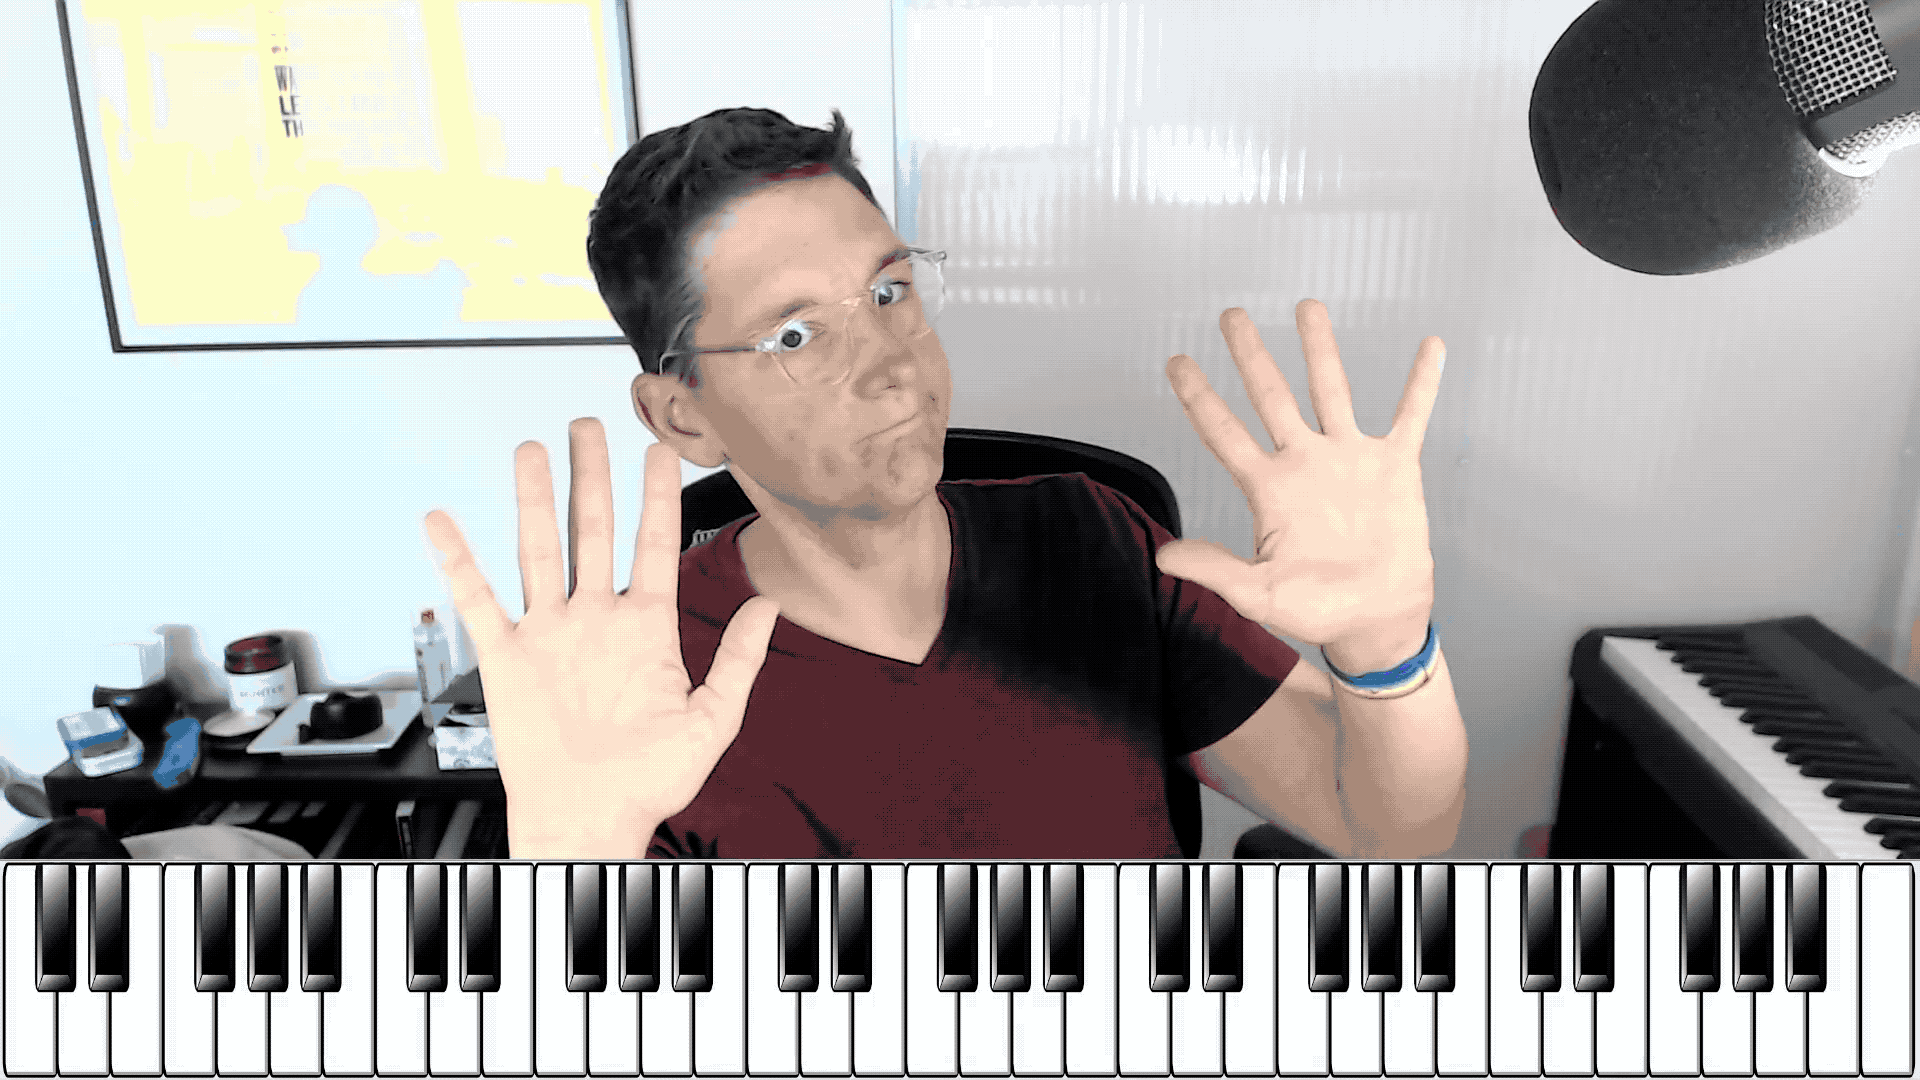
Live video from my webcam, plus an interactive animated keyboard that responds to my connected MIDI keyboard.
Now that we have our measurable learning outcome, let’s take a look at the next part of the syllabus.
Required materials
- Hardware
- Mac (Windows will also work, but I’m not set up to demo it.)
- USB MIDI keyboard (mine: Yamaha P-115, for the price and size, I like this one.)
- Webcam (mine: Logitech C9202, but the built-in one is fine)
- Software
- Zoom
- OBS Studio (free and open source)
OBS (macOS) Virtual Camera plugin (free and open source)No longer required as of OBS Studio 26.1- Virtual MIDI Piano Keyboard (VMPK, free and open source)
I’m going to describe this setup for the Mac, but it should work more-or-less the same way on Windows. If you’re following along on Windows, you’ll need this version of the OBS virtual camera plugin instead. Virtual camera is now built in on Windows and Mac.
I’ll give you a minute to download and install all that stuff. After you’ve installed the virtual camera plugin, you may have to restart Zoom or OBS Studio once or twice to make sure they’re seeing the new virtual camera.
Instructions
We’re going to use OBS Studio to combine the camera feed and the VMPK window into a single video stream. Then, we’re going to send that stream to Zoom by creating a virtual3 camera. Finally, in Zoom, we’ll select that fake camera, instead of the one plugged into the computer. This will take a little bit of setup the first time, but everything will be saved automatically. You should only have to go through all these steps the first time.
Questions? No? Alright. Here we go.
Set up VMPK
VMPK should work pretty much right out of the box. It’s not beautiful, but it’s very functional. In preferences (vmpk > Preferences) you can change the number of keys and the colors that it uses. I like to stick with plain ol’ blue, but you can do whatever you like, including a multicolor setup. I have mine set to be 61 keys so they don’t get too small to see over Zoom. You may need to adjust the “Base Octave” in VMPK to get the register you expect. Mine is set to 3.
Test your keyboard to make sure it’s lighting up the keys you expect in VMPK. If you don’t see anything change when you play the keyboard, open Edit > MIDI Setup and make sure you have checked Enable MIDI Input and MIDI Omni Mode. That will ensure that VMPK will accept any incoming MIDI signal from any connected MIDI device. We’re done messing with VMPK for now, but leave it open in the background. To use it for our live presentation, we can put other windows on top of it, but we can’t minimize or close it.
Create a “Scene” in OBS Studio
Create a Scene that combines your camera and VMPK. There’s a lot going on in OBS Studio. Don’t pass out. First, we’ll need to create a Scene by clicking the + in the Scene’s panel in the bottom left. Name it whatever you like. Mine is called “Piano keyboard”. Have I mentioned that I am a creative professional?
Add your camera
With your newly created Scene selected, click the + in the Sources panel. We want to add a Video Capture Device. Select Create new and call it something clever like “webcam”. I’m going to call my Logitech C920 “C920”. In the window that comes up next select your camera (Device) and resolution (Preset). For my camera, I selected “high”, but you might see a different set of options depending on your camera. Click OK.
Your Source should now show up in the Sources list for the Scene you created in step 2. If for some reason it isn’t, click the eye icon next to it in the Sources panel. If your video output and your camera are different resolutions, you may need to click the camera feed in the Program panel (that’s where your camera’s picture should be) and resize it using the red transform controls (little red squares in the corner).
Add the VMPK window
Since VMPK is still running, we can grab a picture of it. Think of it like a continuously updating screenshot. In the same Sources panel where our camera feed is listed, click + again to add a new source. This time, we want a Window Capture. Select Create New and give it a name. We’re going to be capturing VMPK, so I’m going to call it “Steve”. Just kidding. I’m going to call it “VMPK”. In the Properties window that pops up, select “[Virtual MIDI Piano Keyboard] Virtual MIDI Piano Keyboard” and click OK.
You should see the VMPK window on top of your camera feed now, and it should be listed above your camera feed in the Sources panel. Use the transform controls to resize the VMPK window and drag it so that the lowest and highest keys fit within the video frame. If you want to position it in the same place as mine (at the bottom), drag it down so that it “snaps” in place. It’s ok to let the non-piano-key parts of the window hang off the left and right.
Now, we want to crop out all the settings nonsense from the VMPK window that’s above the piano keys. To do that hold down the option key (alt on Windows) while you drag the transform handle at the top of the VMPK capture in the Program panel. While you have the option key down, the transform controls will crop instead of scale the VMPK capture. Now your OBS program should show exactly what you want your students to see in Zoom.
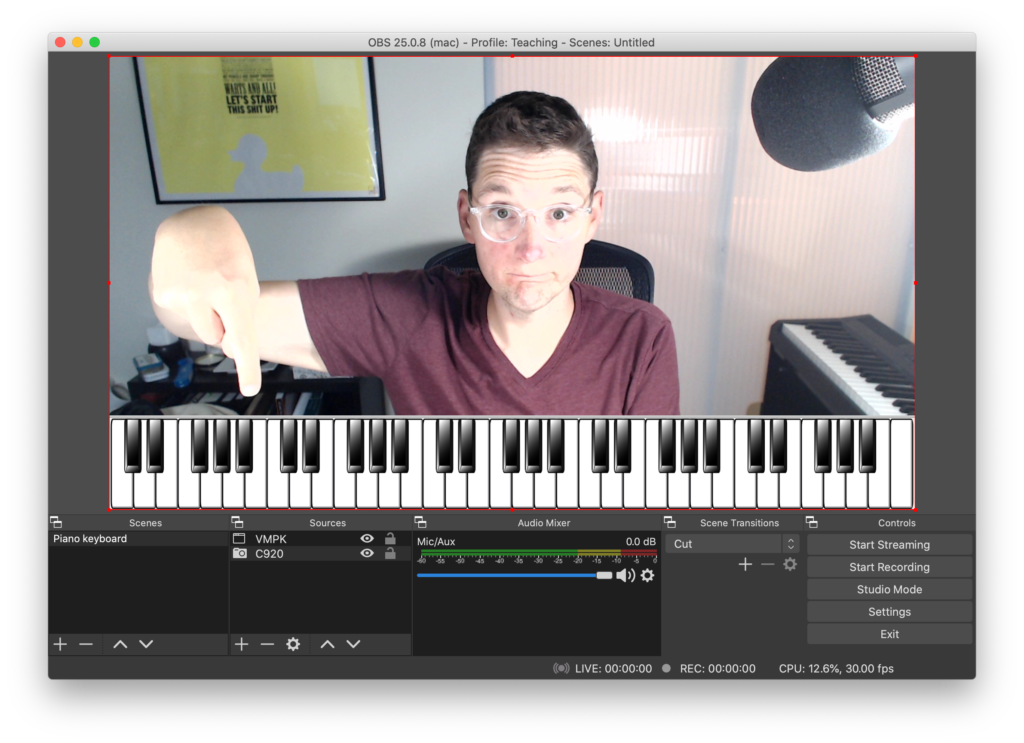
I know this took a lot of effort, but remember that everything we just did is already saved. If you plan to use OBS for other things in the future, you can save this setup by naming it something memorable in Profile > Rename. We’re done with the hard stuff, I promise.
Start the virtual camera in OBS
To start the built-in virtual camera in OBS, you should see a button on the control palette (bottom right) that says Start Virtual Camera. You can assign a keyboard shortcut to this if you would like in OBS > Preferences > Hotkeys and finding the blank next to “Start Virtual Camera” and “Stop Virtual Camera”. I use the same keyboard shortcut ⇧⌘V for both.
If you’ve installed the virtual camera plugin, you can start it in OBS Studio by going to the Tools menu and selecting Start Virtual Camera. If you don’t see it there, that means the plugin isn’t installed. If you think you’ve already installed it, try restarting OBS and/or Zoom.
Show your work in Zoom
Once you’ve got the virtual camera started, you can switch over to Zoom and start (or join) a meeting. Start your video in Zoom and use the arrow on the video button to select OBS Virtual Camera. If you don’t see OBS Virtual Camera as an option, you may need to update Zoom by going to zoom.us in your menu bar and selecting Check for Updates. If you’re already up-to-date, try restarting Zoom.
At this point you should see your camera feed showing up in Zoom. If you see your image as mirrored, don’t worry. It only looks that way to you. Your meeting attendees will see everything normally, and it will record normally as well. If that freaks you out a little, you can go to Zoom > Preferences > Video and uncheck Mirror my video. This will make your piano look normal to you, but it will make it a little awkward to fix your hair by looking at Zoom until you get used to it.
Conclusion
To recap: Your OBS Profile, Scene, and Camera/Window Capture will all be saved in OBS Studio automatically. You don’t have to click “Save” or anything. The next time you have class (or just want to show your friends how cool you are) just open VMPK, OBS, and Zoom; start the virtual camera (Controls palette > Start Virtual Camera); and then launch or join your Zoom session.
In your Zoom session, this isn’t going to explode your feed to fullscreen the way a screenshare does, so you may want to suggest to your attendees that they “pin” your video by clicking the three-dots in the top right corner of your video and selecting “Pin”. This also won’t share your audio. Audio routing is outside the scope of this particular post, but there are a number of ways to take care of this.4 Another small challenge is that if you are recording your sessions and don’t “pin” your own video in Zoom, you and your fancypants piano keyboard will just be one tiny part of the Brady Bunch grid.5
My favorite thing about this setup, in addition to it being free and relatively painless (especially after the first time) to set up, is that it represents a small but meaningful example of the kind of thing that suits a Zoomclass that is hard or impossible to replicate in meatspace.
If you try this out with your class, I’d love to hear how it goes!
EDIT, 7 September 2020: I’ve heard from a few folks who have gotten everything working except live input from a hardware keyboard into VMPK. There are a lot of variables that could possible cause this issue, but I think the most common one is the selection of a different “MIDI IN Driver” in the VMPK settings. In VMPK, if you go to Edit > MIDI Connections, you’ll get a dialog with a few options to fiddle with. I think for most people, you’ll need to check Enable MIDI Input, MIDI Omni Mode, and set your MIDI IN Driver to CoreMIDI on a Mac, or the equivalent on Windows. Here’s what my settings look like.
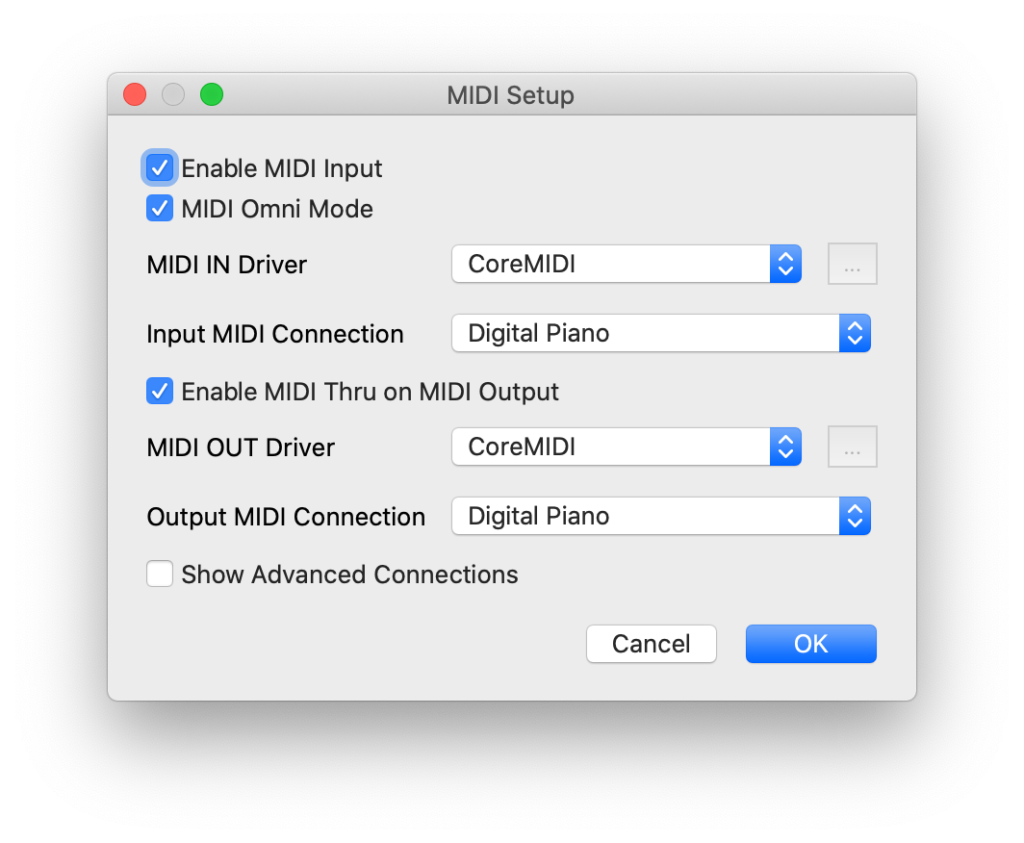
In this screenshot “Digital Piano” is the name of my hardware keyboard. (Not very creative, but descriptive.) Thanks to Danielle and others who asked!
- Everything is relative. Buckle up, Buttercup. We’re getting nerdy. ↩
- At the time of this writing (August 2020), please don’t buy a webcam from Amazon. 3rd-party Amazon sellers are price-gouging for all the work-from-home. If you really want to upgrade to a nice webcam, you’re better off watching places like B&H or Best Buy for when they get them in stock. ↩
- Like homeopathy, “virtual” means “pretend”. ↩
- Short version: open GarageBand or any other app that will make sound and share audio how you normally do. I use Loopback from Rogue Amoeba, but you can also use the built-in Zoom audio sharing features in Share Screen > Advanced > Music or Computer Sound Only. Loopback is $100 and worth every penny, but I totally get that not everyone is prepared to drop that kind of money on software that may only be used for Zoom music class. ↩
- A possible workaround is to record your video directly from OBS, but then you’re recording two videos per class, which will either require some editing to assemble with the Zoom video (way too much time and effort to do each day) and a boatload of space for those video files. Pinning your video will help, but that makes it a little harder to see your attendees. As ever, we live in a world of compromise. ↩