It’s really easy to make online lectures that suck. If my lesson is just me talking for 50 or 75 minutes, it’s a of a waste of the format. We’ve all committed to building our schedules around having these precious hours together at the same time, so I’d hate to waste it by doing little more than a poorly rehearsed YouTube video.
Polls in Zoom are an easy way to give some level of interaction with even really big classes. The downside of Zoom polls is that they suck to create: you have to log into the web and do them in advance of the meeting. They can’t easily be spontaneous, and I can’t-slash-won’t (lazy? maybe) plan far enough in advance to assemble meaningful one-time-use polls.
My solution is to create a couple of very simple, generic polls that I can place in a relevant context for each meeting. If that sounds like nonsense, I expect an example will help.
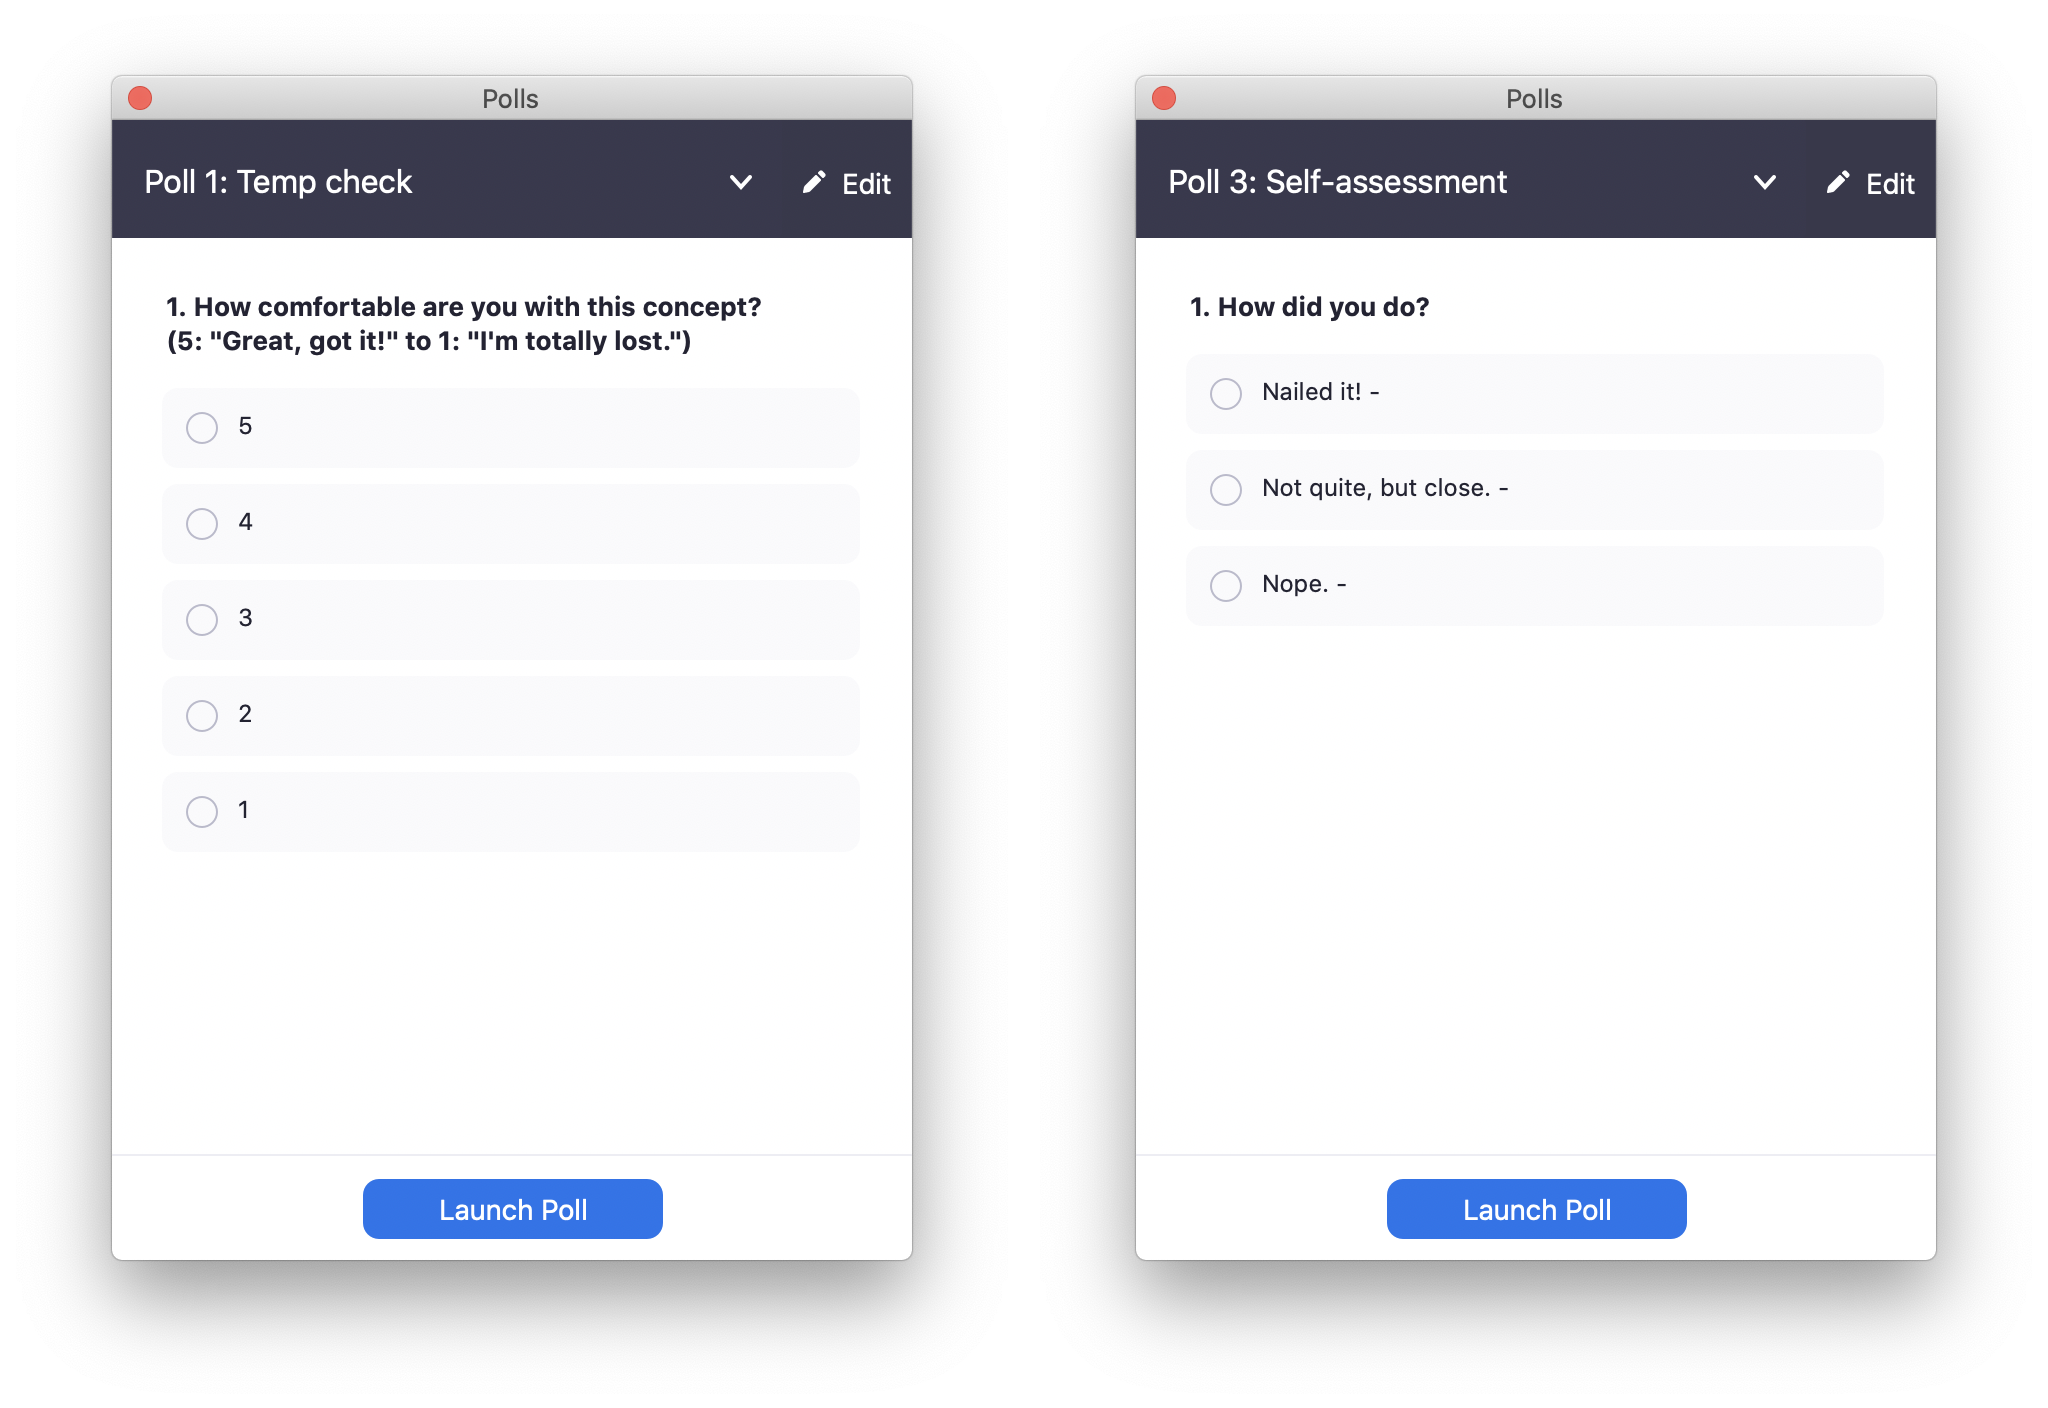
The one I use the most frequently I call “Temp Check”, and it simply asks “How comfortable are you with this concept? (5: ‘Great, got it!’ to 1: ‘I’m totally lost.’)”. I say aloud what I’m referring to (“Tell me how you’re feeling about constructing harmonic minor scales.”), then launch the poll. Best of all, it’s anonymous, at least from other students.1 I think this makes students more comfortable admitting they don’t know something, and it’s been really helpful in pacing new material.
A similar poll I use a lot is a very simple self assessment. After we do an activity in class, such as “write out the counting for this measure’s rhythm”. Then we look at it together and I ask everyone to self assess, with the options of either “Nailed it!”, “Not quite, but close.”, and “Nope.” Again, this lets me see how students are doing as a whole without singling anyone out, and it also makes sure they’re all playing the home version of the gameshow, since I can see how many folks have answered and make sure (nearly) everyone does before moving on. And this is all way less tedious than creating a different poll for each concept or meeting. Because I use the same recurring Zoom session for each class meeting, I only have to set these up one time.
Note that you can’t use emoji in poll options. Those dashes on the right are emoji that have been stripped out. 😩
To create a poll, log into Zoom on the web (not the app), and go to Meetings > My Meetings and scroll to the bottom of the page to find Polls, with a button in the right corner to add a new one.
Having just one or two of these that you can recycle in a lot of different situations can help keep your prep time down, and students quickly get used to responding to these questions when they see them regularly. This kind of recycling won’t save the planet, but it might help preserve your prep time sustain your personal health.
If I really want to know, I can dig into reports after the meeting is over to see who selected which options. But like most things related to polls, it’s more trouble than it’s worth. ↩
Considering the rapidly evolving landscape of realtime audio collaboration tools that musicians and music teachers are swimming in at the start of the school year (in the northern hemisphere), I think the new Zoom audio features are a huge step forward in quality and simplicity.
…
While Zoom’s new audio quality isn’t quite as high as Cleanfeed, the added convenience and simplicity more than makes up for what small quality differences exist. It’s not a perfect A-to-B comparison since they’re using different compression algorithms, so some things might sound better on one than another. And depending on your setup and the setups of your collaborators or students, I’m not convinced everyone would notice a difference at all based on my brief testing.
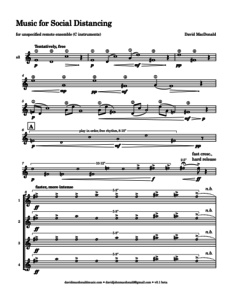
I initially wrote and presented this paper about my composition Music for Social Distancing for the 2020 Aspen Composers Conference.1 If you’re interested in the work that is the subject of this paper, you can get the score and performance information on my site. The presentation included this performance of the work by Wichita State University’s Happening Now new music ensemble, with a little help from my friends.
Introduction
In March 2020, I and countless other musicians across the United States were asked to stay in our homes and limit our personal interactions as much as possible to limit the spread of the novel coronavirus. This impacted nearly every music presenter, performer, venue, and school in many ways. As many interpersonal interactions—meetings, lessons, and even parties—migrated to videoconference platforms like Zoom and Skype, it quickly became obvious that performing traditional repertoire would not be feasible over these platforms for a variety of reasons I will discuss momentarily. Even beyond the common practice period, more recent, flexible compositions pose similar challenges to remote performance. In this presentation, I will discuss some of the issues associated with remote ensemble performance, the compositional techniques I used in my work Music for Social Distancing to account for those issues, and the experiences with various readings and performances of the work in the months since I first published it.
The term “social distancing” was quickly and widely adopted by health and policy experts in the earliest days of the pandemic. The World Health Organization (WHO) and US Centers for Disease Control and Prevention (CDC) recommended that individuals maintain a minimum of six feet of space between themselves and others outside their household. However, it quickly became apparent that “social distancing” might not be the most apt description of this recommendation, and some adopted the phrase “physical distancing” instead. In a WHO press conference, Dr. Maria Van Kerkhove elaborated:
… [K]eeping the physical distance from people so that we can prevent the virus from transferring to one another, that’s absolutely essential. But it doesn’t mean that socially we have to disconnect from our loved ones, from our family. Technology right now has advanced so greatly that we can keep connected in many ways without actually physically being in the same room or physically in the same space with people. … So find ways to do that, find ways through the internet and through different social media to remain connected because your mental health going through this is just as important as your physical health.2
This idea, maintaining social bonds in spite of physical isolation, became very important to me as I was working on this piece, teaching lessons and classes remotely, and imagining what music could look like under these restrictions. I will continue to use the expression “social distancing” here, as it is more familiar, but I intend it to mean physical and geographic separation rather than social isolation.
Virtual ensembles
When institutions started canceling concerts and universities and conservatories started sending students home, I and many of my colleagues scrambled to find the best ways to move our performances, rehearsals, and classes to the Internet. A popular question in online music forums was “What application do I need to use to have my rehearsal online?”. The obvious assumption there is that there was such a thing. It turns out there wasn’t, isn’t, and likely won’t be any time soon, due to technical limitations.
One well-explored solution is that of so-called “virtual ensembles”, exemplified and popularized by Eric Whitacre’s Lux Aurumque virtual choir video in 2010. Virtual ensembles create a fixed recording and require a reasonably high level of planning, editing, and technical expertise. As recordings, they are fixed and do not unfold in realtime as live performances. Additionally, unlike most classical music recordings, they are not created in a way that allows performers to listen and react to one another, because they are not in the same room and at the same time. As admirable and impressive as virtual ensemble recordings are, I did not find them to be a very good substitute for the things that I missed most from the performances that I loved.
Chamber music
One particular thread in an online music teaching forum got stuck firmly in my mind. It was devoted to a question about how to do remote chamber music coaching, rehearsing, and performance. There were a number of suggestions that all centered around making multitrack virtual-ensemble-style recordings. Each time some version of this was suggested, the asker promptly replied “that is not chamber music!” I want to examine what chamber music is, and why I felt that remote chamber music performance required the creation of a new kind of repertoire.
In the simplest, most literal sense, chamber music is defined by the small size of the performing ensemble. It is the implications of that small size that make chamber music worth distinguishing from larger works. Conductorless musicians have greater responsibility for shaping the performance individually, listening, and reacting to one another, encouraging what James McCalla in the preface to his Twentieth-Century Chamber Music describes as “individuality as an essential part of [their] collectiveness”.3 This individual-collective dichotomy is what I find most appealing about chamber music. It is what allows chamber music to be subtle, and intimate, and exciting. However, these same features are also the first to falter when attempting remote performance over the Internet.
Reacting to sounds of other musicians in chamber music relies on the ability to hear nearly instantly every other musician in the ensemble. In a chamber ensemble setting where performers are positioned within a few feet of one another, the delay from the speed of sound traveling through the air is negligible, just a few milliseconds. Take those same players and move them to different locations connected over the popular Zoom videoconferencing platform, and the time it takes a player’s sound to reach their colleagues ears is likely in the hundreds of milliseconds, roughly equivalent to being spaced hundreds of feet apart. Even using specially engineered, low-latency solutions, it is difficult to achieve a level of precision most musicians would be comfortable with. The physical limitations of converting an audio signal to digital information, translating that over several network layers, and converting it back to audio, will likely always be too slow for live performance between musicians performing together from their respective homes. It’s possible that performances could be arranged by a synchronized click track, but that precludes flexibility and spontaneity in many of the same ways as virtual ensembles.
While latency is the largest and most prominent limitation for remote musical performance, it is not the only one. Services like Zoom, Skype, Google Meet, and others were designed to allow verbal conversations, which have a very different sound profile and performance characteristics to music performance. In addition to being more tolerant of latency, spoken communication does not have the same dynamic range or frequency range, and unlike music, conversations rarely have more than one or two simultaneous contributors. Because of these differences, videoconference platforms often compress the dynamic range and attenuate high and low frequencies of a music performance. They may also identify very soft sounds as noise, and attempt to remove them. When more than two players are sounding at the same time, the platform may decide to silence other audio feeds. Different platforms offer varying levels of control over the categories and degrees of audio processing, but none are built with the goals of music-making.
Working within extreme limitations often requires works to have a degree of flexibility. However, many popular examples of flexibly scored music—Terry Riley’s In C and Julius Eastman’s Stay On It—are open ended in certain parameters like texture, form, duration, and orchestration, but still require an extremely high degree of rhythmic precision (relative to a common pulse) and also ask each player to be acutely aware of every other player’s sound in real time.
Compositional techniques
I wrote Music for Social Distancing for unspecified remote ensemble, four or more players and optional conductor, in March, with the intention of making it available to school ensembles who were starting remote instruction and other ensembles struggling to find something to do with what remained of their season. The work calls for performers to play from home over a videoconference, and the composite of all the players is streamed live to an audience. In this medium, I chose to focus primarily on the issue of audio delay, which I see as the most obvious barrier to remote performance. I also wanted to make sure that players were truly making chamber music by listening and reacting, not just contributing their discrete layer at roughly the same time as the rest of the ensemble.
The opening and closing sections of the work move forward through latency and listening. All four parts play the same lines (with octave adjustments as needed). Each note or two- to three-note gesture is labeled as being initiated by one of the four parts, and the other players only move to that gesture after they hear someone else play it. For example, the piece opens with an F which is initiated by Player 1. The other three players wait to play the F until they hear it from Player 1. All players sustain this until Player 3 moves down a third to D, at which point the other three join the new unison. The result is a kind of floating cloud of canon-like imitations that drift based on who the leader is, how clearly they are heard by the other players, and what the player-to-player latency is at that moment.
Latency-driven opening passage
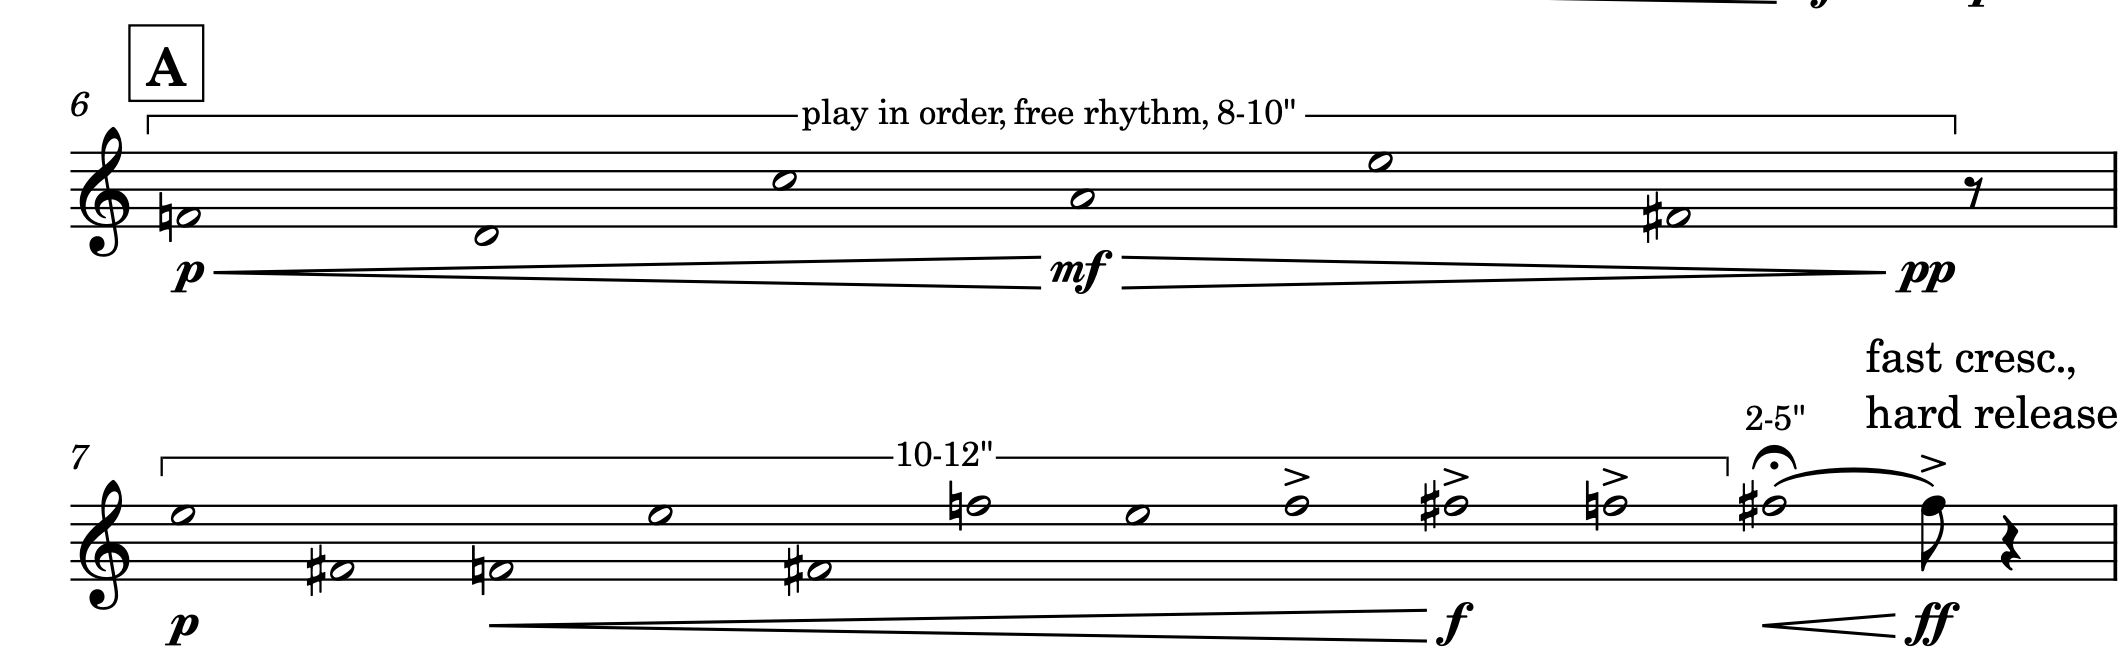
The next section, mm. 6-9, allows each player to decide the pace at which they move through a succession of pitches over a given period of time. For example in m. 6, players are given eight to ten seconds to move through six pitches. The result is somewhat similar to the opening section, however the difference is that individuals have the opportunity to diverge from one another a bit further. The beginning and ending of each one-measure phrase will be relatively stable, but the middle is a point of maximum divergence, as some players may choose to start quickly and end slowly, while others choose the opposite and others do something in between. This gives the individual players yet more control over the unfolding of the work, and greater responsibility for listening and reacting.
Time-bracketed passage in “unison”
Time-bracketed passage with divergence
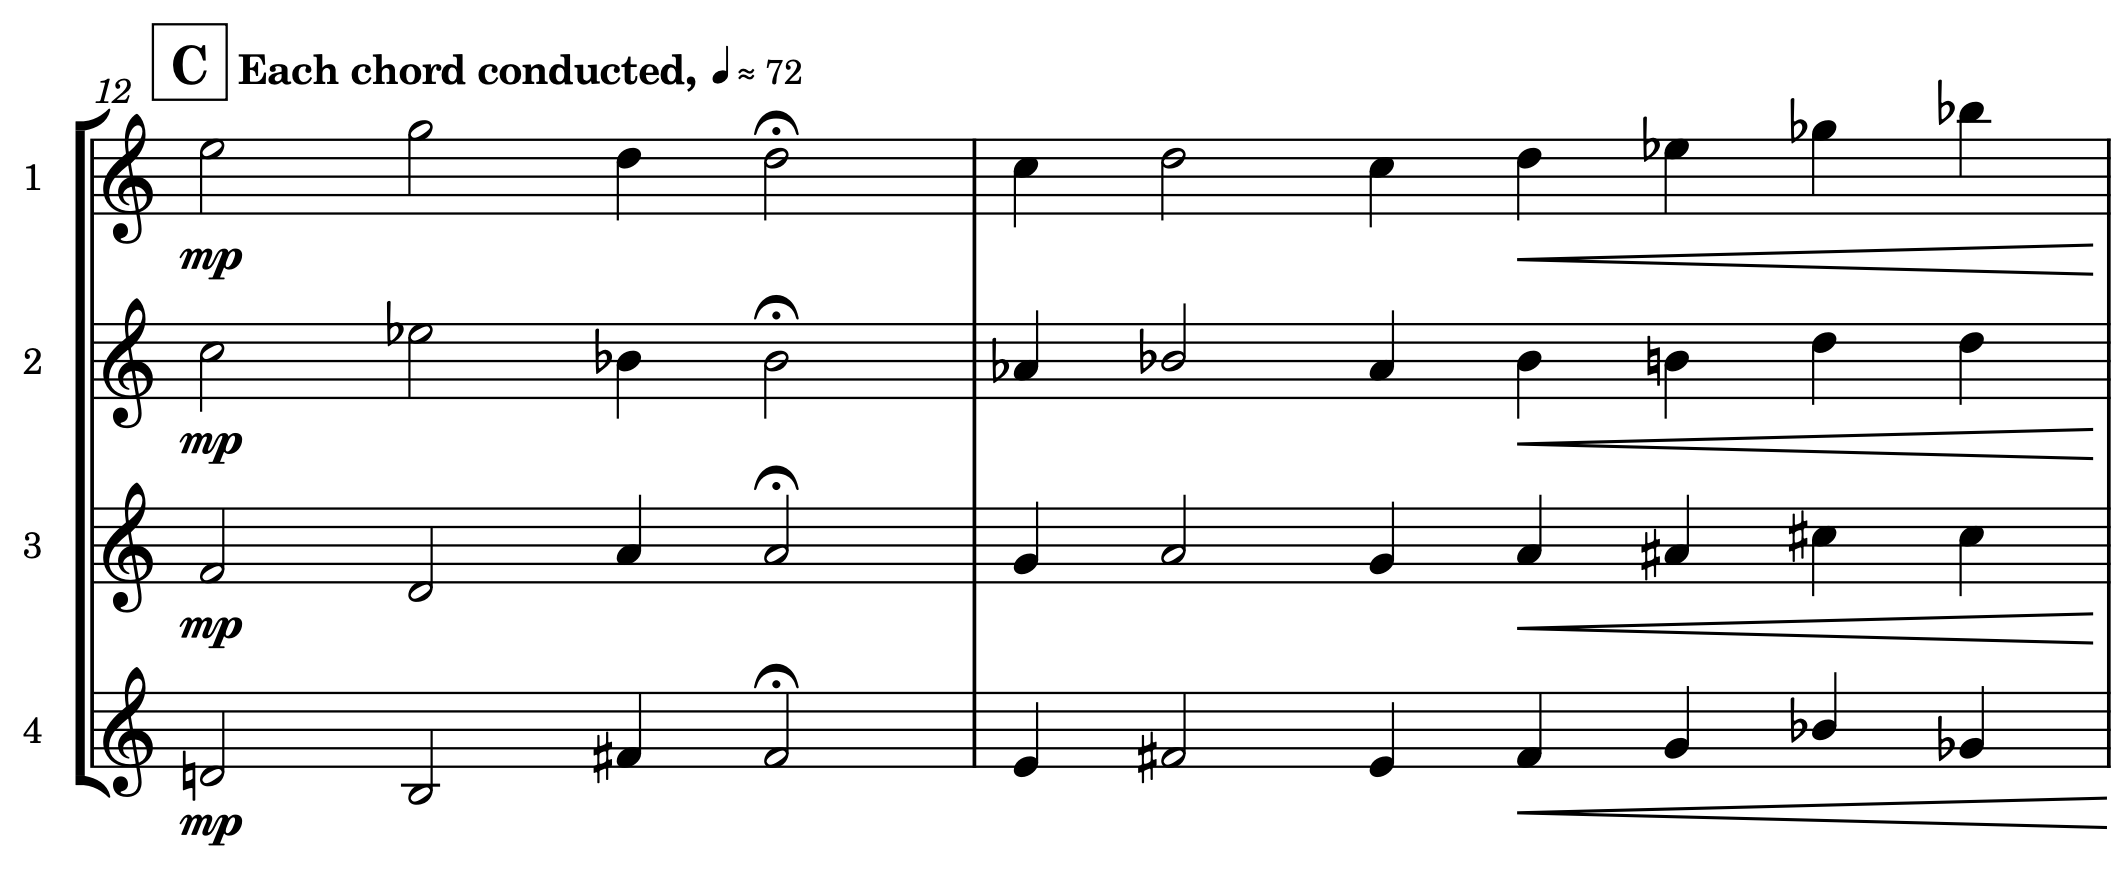
After a short transition (mm. 10-11) which refers to the latency-driven idea of the opening section (this time without the canon-like imitation), I present the most conventional chamber music texture of the work: a chorale. In this remote performance setting, each chord is conducted visually. Since there is sometimes some drift in audio-video synchronization of the videoconference, this can show some other implications of the network and software environments of the performance. The not-quite synchrony of this section concludes with the loudest section of the work, which is also the moment where players are least likely to hear one another and the least reliant on aural cues.
Conducted chorale
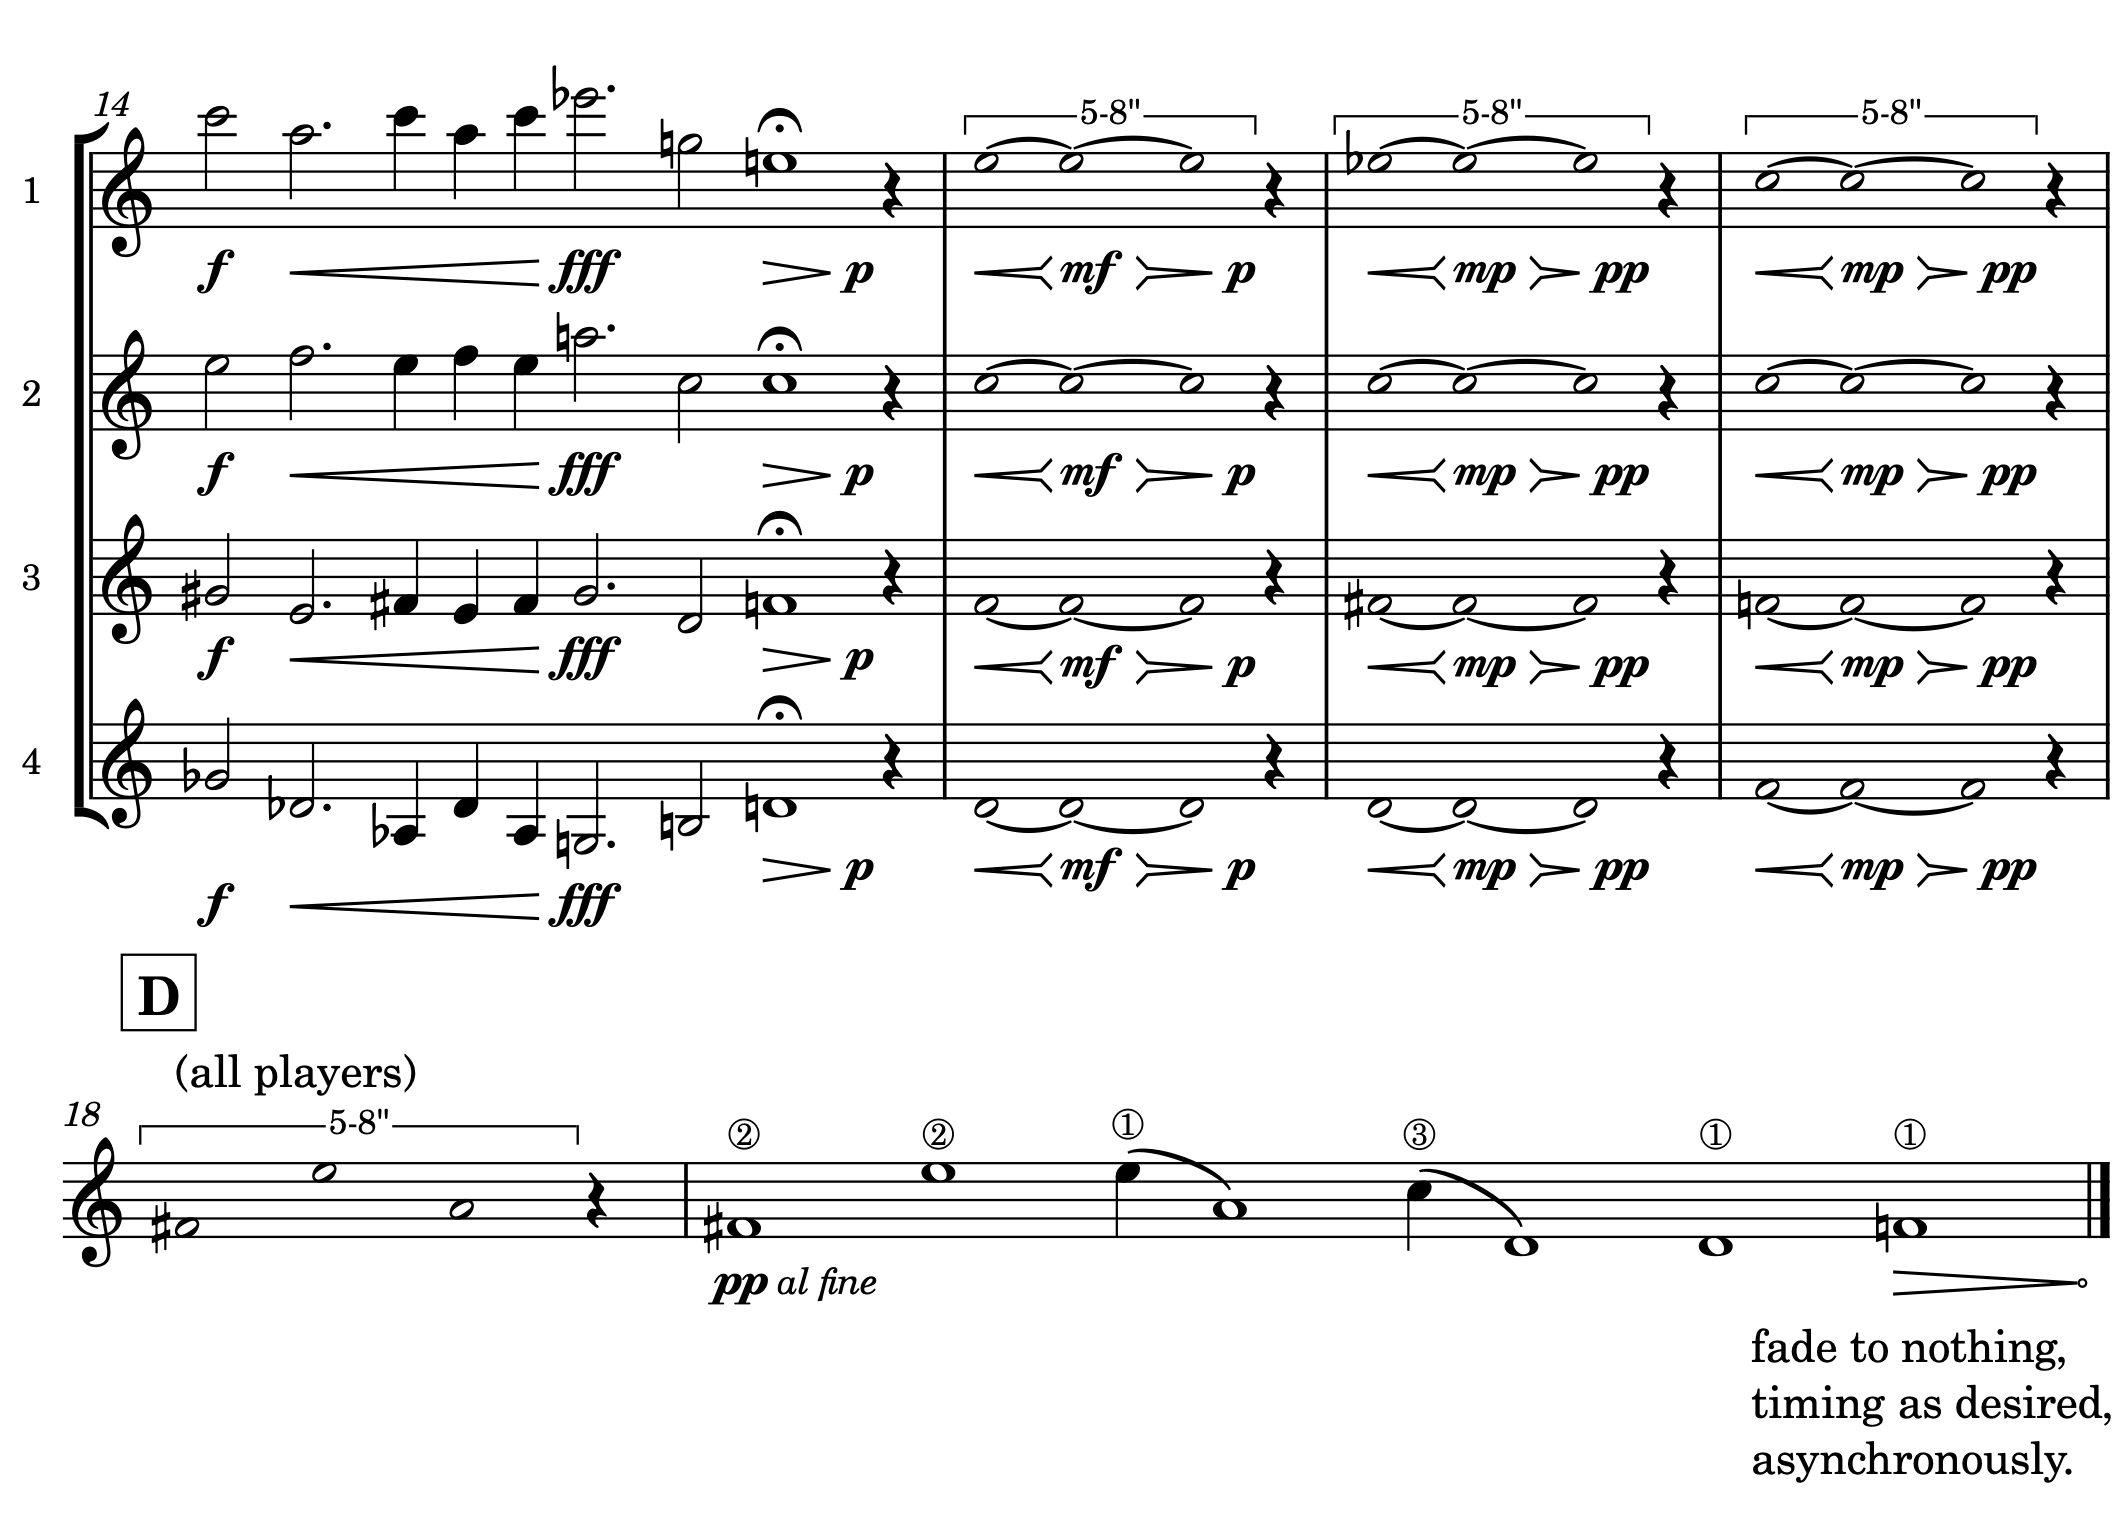
The next passage is a brief variation on the time-bracketed phrases of mm. 6-9. In it, players choose a moment within a time window to quickly swell from soft to loud and back to soft. My goal in this section is to highlight any quirks of the audio processing happening within the videoconference application. Fast dynamic changes can trip up compressors and cause them to behave strangely. Receiving a suddenly loud sound from one feed might cause the conference to drop audio from another feed entirely. The uncertainty here is coming from a combination of player choice and unpredictable audio processing algorithms. I like to think of the ensemble as playing Zoom like a musical instrument during these moments. And the piece concludes with a textural recapitulation of the follow-the-changing-leader idea which opens the piece.
Closing passage featuring quick swells
The techniques I use are central to my conception of the piece. They are musical solutions to technical problems, which make Music for Social Distancing not simply tolerant of network delay, but in some ways reliant on it. This piece would not work the same way for an ensemble of musicians all sitting in the same room.
Performances
Music for Social Distancing was written in response to physical isolation that musicians at all levels were dealing with in their own ways. Because of the flexible nature of so many of the key elements of the work, the technical demands are relatively low, which has allowed the work be be performed by high school, university, and professional musicians. I want to briefly discuss some of the reception that it received from performers.
The first four groups4 to rehearse and perform Music for Social Distancing all did so within about a month of one another. I was pleasantly surprised at the number of groups that were interested in taking on such an unusual experiment. The first thing that all three ensemble directors told me was “We needed this” or “It felt so good to make music together again.” This to me is the biggest indicator that the work achieves at least some of the goals that I set out regarding an expression of chamber music collaborative spontaneity over a physical distance.
In addition to this positive feedback, I also heard about—and experienced in my own performance—a few notable challenges that could be addressed either technologically or through further exploration of compositional techniques.
All of the performances that I’m aware of so far have used Zoom as the videoconference platform, and all of them have struggled to varying degrees with Zoom’s audio processing. As much as I tried to account for this with the composition techniques I described earlier, there are still some serious limitations, particularly around the way Zoom selects individuals to be the “main” speaker. Certain timbres or frequencies seem to regularly push out others from the mix in a way that can’t be mitigated by any of the currently available audio settings in the application. Even with Zoom’s “Original Sound” feature enabled, there is still a certain amount of echo cancelation, dynamic compression, and data compression that is inescapable.5
Relatedly, some particularly loud instruments struggle to play within the dynamic range that is suitable for built-in microphones on most laptops. In terms of objective audio quality, having all players use specialized audio equipment could improve these concerns, but at the same time, I find the uneven sounds to have a pleasing verisimilitude that reflects how these technologies are used in their intended contexts. Having better ways to control audio clipping for louder instruments and better microphone options for mobile devices could dramatically improve the overall audio quality of the performance.
The last challenge with the work goes well beyond musical performance but is worth mentioning in this presentation because of the number of student musicians performing this work. It seems unavoidable to me that a performance of a work that requires certain computers, audio hardware, or Internet connectivity will shine a bright light on any discrepancies in technology access. Performing Music for Social Distancing is quite challenging in ensembles where some players are using devices with desktop operating systems, and others are using mobile devices or Chromebooks. It would be deeply unjust to tell a group of students that a particular rehearsal or performance opportunity is only available to students who have an instrument at home, a laptop that meets x requirements, and a broadband Internet connection of at least y megabits per second.
Performances of Music for Social Distancing all dealt with at least some of these issues, and yet all were successful on the whole. Some of these concerns may improve over time—such as software options or broadband availability—but others will require yet more creative solutions both in and out of my control as the composer.
Conclusions
I am presenting this around four months after social distancing became a shared social and cultural experience, and it feels at this moment as though it may be here for quite a while, as intimidating and depressing as that might be. Music for Social Distancing was an experiment in making music remotely as a group. The compositional techniques that I have described today could be explored much more deeply, and there are many more possibilities. I hope that I can contribute music that is thoughtfully constructed for these times. I don’t want to give up on chamber music simply because we can’t make it in the same ways we are used to. Rather than forcing traditional compositional techniques, textures, and styles to fit into the limitations of socially distant performance, I want to take what is available and makes music with it.
As a shy midwesterner, I am very uncomfortable with writing a few thousand words about my own music, and I feel an appropriate amount of shame for posting it here on the blog. Ope. ↩
Plano West Senior High School String Quartet, Ryan Ross, director; Susquehana University Symphony Orchestra, Jordan Smith, director; a Milliken University faculty mixed chamber ensemble, Corey Seapey, director; and Lone Star Youth Orchestra, Kevin Pearce, director. ↩
As of this blog post in late August 2020, Zoom has announced in a blog post that they will be releasing a new “Advanced Audio” feature which eliminates even the echo cancelation and dynamic compression. The performance presented at the conference used Zoom for video with Cleanfeed for realtime(ish) audio to avoid compression. ↩
UPDATE 13 Jan 2021: OBS Studio 26.1 for Mac has since added a built-in virtual webcam, which means you no longer need to install the extra plugin. If you have already set up OBS with the plugin, you must remove the plugin.
For better or worse, the piano keyboard informs a lot of my teaching, and having a way to show a keyboard in realtime on Zoom has been something I’ve been trying to work out since we were exiled from campus back in March. Most of the pieces needed to make this happen have existed for a while, but it’s only in the last few weeks and months that they’ve been updated to make connecting them together relatively1 easy and reliable.
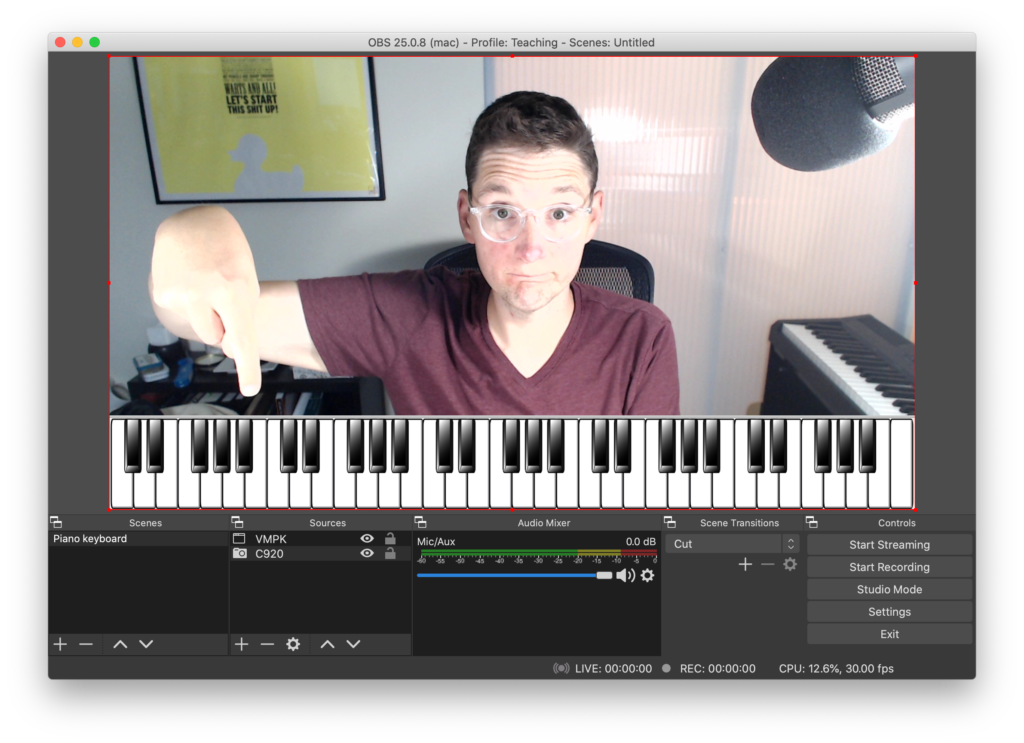
Here’s our end goal.
Live video from my webcam, plus an interactive animated keyboard that responds to my connected MIDI keyboard.
Now that we have our measurable learning outcome, let’s take a look at the next part of the syllabus.
Required materials
Hardware
Mac (Windows will also work, but I’m not set up to demo it.)
USB MIDI keyboard (mine: Yamaha P-115, for the price and size, I like this one.)
Webcam (mine: Logitech C9202, but the built-in one is fine)
I’m going to describe this setup for the Mac, but it should work more-or-less the same way on Windows. If you’re following along on Windows, you’ll need this version of the OBS virtual camera plugin instead.Virtual camera is now built in on Windows and Mac.
I’ll give you a minute to download and install all that stuff. After you’ve installed the virtual camera plugin, you may have to restart Zoom or OBS Studio once or twice to make sure they’re seeing the new virtual camera.
Instructions
We’re going to use OBS Studio to combine the camera feed and the VMPK window into a single video stream. Then, we’re going to send that stream to Zoom by creating a virtual3 camera. Finally, in Zoom, we’ll select that fake camera, instead of the one plugged into the computer. This will take a little bit of setup the first time, but everything will be saved automatically. You should only have to go through all these steps the first time.
Questions? No? Alright. Here we go.
Set up VMPK
VMPK should work pretty much right out of the box. It’s not beautiful, but it’s very functional. In preferences (vmpk > Preferences) you can change the number of keys and the colors that it uses. I like to stick with plain ol’ blue, but you can do whatever you like, including a multicolor setup. I have mine set to be 61 keys so they don’t get too small to see over Zoom. You may need to adjust the “Base Octave” in VMPK to get the register you expect. Mine is set to 3.
Test your keyboard to make sure it’s lighting up the keys you expect in VMPK. If you don’t see anything change when you play the keyboard, open Edit > MIDI Setup and make sure you have checked Enable MIDI Input and MIDI Omni Mode. That will ensure that VMPK will accept any incoming MIDI signal from any connected MIDI device. We’re done messing with VMPK for now, but leave it open in the background. To use it for our live presentation, we can put other windows on top of it, but we can’t minimize or close it.
Create a “Scene” in OBS Studio
Create a Scene that combines your camera and VMPK. There’s a lot going on in OBS Studio. Don’t pass out. First, we’ll need to create a Scene by clicking the + in the Scene’s panel in the bottom left. Name it whatever you like. Mine is called “Piano keyboard”. Have I mentioned that I am a creative professional?
Add your camera
With your newly created Scene selected, click the + in the Sources panel. We want to add a Video Capture Device. Select Create new and call it something clever like “webcam”. I’m going to call my Logitech C920 “C920”. In the window that comes up next select your camera (Device) and resolution (Preset). For my camera, I selected “high”, but you might see a different set of options depending on your camera. Click OK.
Your Source should now show up in the Sources list for the Scene you created in step 2. If for some reason it isn’t, click the eye icon next to it in the Sources panel. If your video output and your camera are different resolutions, you may need to click the camera feed in the Program panel (that’s where your camera’s picture should be) and resize it using the red transform controls (little red squares in the corner).
Add the VMPK window
Since VMPK is still running, we can grab a picture of it. Think of it like a continuously updating screenshot. In the same Sources panel where our camera feed is listed, click + again to add a new source. This time, we want a Window Capture. Select Create New and give it a name. We’re going to be capturing VMPK, so I’m going to call it “Steve”. Just kidding. I’m going to call it “VMPK”. In the Properties window that pops up, select “[Virtual MIDI Piano Keyboard] Virtual MIDI Piano Keyboard” and click OK.
You should see the VMPK window on top of your camera feed now, and it should be listed above your camera feed in the Sources panel. Use the transform controls to resize the VMPK window and drag it so that the lowest and highest keys fit within the video frame. If you want to position it in the same place as mine (at the bottom), drag it down so that it “snaps” in place. It’s ok to let the non-piano-key parts of the window hang off the left and right.
Now, we want to crop out all the settings nonsense from the VMPK window that’s above the piano keys. To do that hold down the option key (alt on Windows) while you drag the transform handle at the top of the VMPK capture in the Program panel. While you have the option key down, the transform controls will crop instead of scale the VMPK capture. Now your OBS program should show exactly what you want your students to see in Zoom.
The finished Scenes and Sources setup in Zoom
I know this took a lot of effort, but remember that everything we just did is already saved. If you plan to use OBS for other things in the future, you can save this setup by naming it something memorable in Profile > Rename. We’re done with the hard stuff, I promise.
Start the virtual camera in OBS
To start the built-in virtual camera in OBS, you should see a button on the control palette (bottom right) that says Start Virtual Camera. You can assign a keyboard shortcut to this if you would like in OBS > Preferences > Hotkeys and finding the blank next to “Start Virtual Camera” and “Stop Virtual Camera”. I use the same keyboard shortcut ⇧⌘V for both.
If you’ve installed the virtual camera plugin, you can start it in OBS Studio by going to the Tools menu and selecting Start Virtual Camera. If you don’t see it there, that means the plugin isn’t installed. If you think you’ve already installed it, try restarting OBS and/or Zoom.
Show your work in Zoom
Once you’ve got the virtual camera started, you can switch over to Zoom and start (or join) a meeting. Start your video in Zoom and use the arrow on the video button to select OBS Virtual Camera. If you don’t see OBS Virtual Camera as an option, you may need to update Zoom by going to zoom.us in your menu bar and selecting Check for Updates. If you’re already up-to-date, try restarting Zoom.
At this point you should see your camera feed showing up in Zoom. If you see your image as mirrored, don’t worry. It only looks that way to you. Your meeting attendees will see everything normally, and it will record normally as well. If that freaks you out a little, you can go to Zoom > Preferences > Video and uncheckMirror my video. This will make your piano look normal to you, but it will make it a little awkward to fix your hair by looking at Zoom until you get used to it.
Conclusion
To recap: Your OBS Profile, Scene, and Camera/Window Capture will all be saved in OBS Studio automatically. You don’t have to click “Save” or anything. The next time you have class (or just want to show your friends how cool you are) just open VMPK, OBS, and Zoom; start the virtual camera (Controls palette > Start Virtual Camera); and then launch or join your Zoom session.
In your Zoom session, this isn’t going to explode your feed to fullscreen the way a screenshare does, so you may want to suggest to your attendees that they “pin” your video by clicking the three-dots in the top right corner of your video and selecting “Pin”. This also won’t share your audio. Audio routing is outside the scope of this particular post, but there are a number of ways to take care of this.4 Another small challenge is that if you are recording your sessions and don’t “pin” your own video in Zoom, you and your fancypants piano keyboard will just be one tiny part of the Brady Bunch grid.5
My favorite thing about this setup, in addition to it being free and relatively painless (especially after the first time) to set up, is that it represents a small but meaningful example of the kind of thing that suits a Zoomclass that is hard or impossible to replicate in meatspace.
If you try this out with your class, I’d love to hear how it goes!
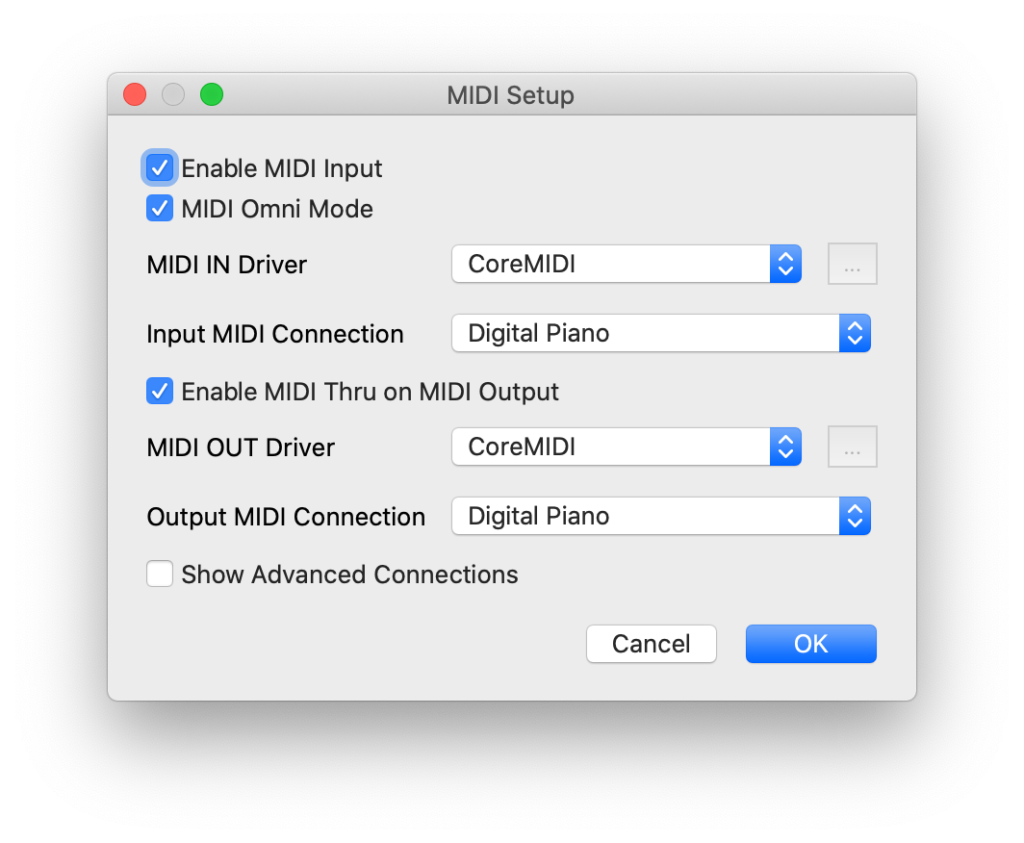
EDIT, 7 September 2020: I’ve heard from a few folks who have gotten everything working except live input from a hardware keyboard into VMPK. There are a lot of variables that could possible cause this issue, but I think the most common one is the selection of a different “MIDI IN Driver” in the VMPK settings. In VMPK, if you go to Edit > MIDI Connections, you’ll get a dialog with a few options to fiddle with. I think for most people, you’ll need to check Enable MIDI Input, MIDI Omni Mode, and set your MIDI IN Driver to CoreMIDI on a Mac, or the equivalent on Windows. Here’s what my settings look like.
My VMPK MIDI Connections settings.
In this screenshot “Digital Piano” is the name of my hardware keyboard. (Not very creative, but descriptive.) Thanks to Danielle and others who asked!
Everything is relative. Buckle up, Buttercup. We’re getting nerdy. ↩
At the time of this writing (August 2020), please don’t buy a webcam from Amazon. 3rd-party Amazon sellers are price-gouging for all the work-from-home. If you really want to upgrade to a nice webcam, you’re better off watching places like B&H or Best Buy for when they get them in stock. ↩
Short version: open GarageBand or any other app that will make sound and share audio how you normally do. I use Loopback from Rogue Amoeba, but you can also use the built-in Zoom audio sharing features in Share Screen > Advanced > Music or Computer Sound Only. Loopback is $100 and worth every penny, but I totally get that not everyone is prepared to drop that kind of money on software that may only be used for Zoom music class. ↩
A possible workaround is to record your video directly from OBS, but then you’re recording two videos per class, which will either require some editing to assemble with the Zoom video (way too much time and effort to do each day) and a boatload of space for those video files. Pinning your video will help, but that makes it a little harder to see your attendees. As ever, we live in a world of compromise. ↩
We’ve all been there. You have a carefully planned lesson. Things are going great. Your students were on time to the Zoom; they have their cameras on so you can see them smiling and nodding. They have good questions. You’re killing this lesson. And then you play your musical example. Crickets. “I don’t hear anything. Does anyone else?” And just like that, it all falls apart, and you lose ten minutes to troubleshooting. Nobody wants that.
One of the most challenging things about teaching music on a Zoom1 conference is playing recordings for everyone. Audio over Zoom is going to be compressed and likely out of sync, that is if you can get audio from where it lives into Zoom to begin with. Showing YouTube videos is worse, because you’re getting another layer of compression with the video, and it’s just a mess if anyone (including the presenter) starts talking over the video.
The solution to these and other problems that I’ve really had fun with is called Watch2gether, a freemium2 service allows YouTube video playback to be synchronized across many different users.
It’s astonishingly simple and reliable. As a free user, I can create a “room”, where I can add YouTube videos to a playlist. I can give a link to that playlist to my students, and then when I press play on a video, it starts playing for everyone else, directly from YouTube. Need to start at 24:13? Need to scrub back a few seconds to catch that cadence again? All of my students’ video players will hop back too. Same with jumping to the next or previous video in the playlist. Rooms also include a text chat feature, but I’ve used it pretty minimally, since I usually have a Zoom conference running alongside it.
I used Watch2gether with my graduate seminar last spring when they presented their research at the end of the term. Since we were remote, I asked them all to record their presentations and upload them to YouTube. Then for the Q&A, we all watched the presentations using Watch2gether and then moved to a Q&A. This meant that our discussions weren’t at the mercy of any presenter’s connection speed, and nobody had to struggle with getting their musical examples to work. (Also, it was lower pressure for the presenters, since they could just re-record or edit as needed.) It’s possible to save a room or a playlist to re-use throughout a course as well.
One thing to look out for is that by default, anyone in the class can take control of the playlist. It could be a fun class project to send them out to YouTube and find examples of things to add to a playlist, but you may not want them putting the latest Cardi B tune in your playlist of Renaissance polyphony. So take note of the playlist settings (which can be changed at any time) if you decide to give it a go with your students.
I have only tried Watch2gether with YouTube, but the company also advertises that it works with other platforms, including Vimeo, Dailymotion, and Soundcloud. Watch2gether is free to use for any of the above features, and for a reasonable $3.49/mo. you can remove ads from the site for any room that you create, which I think is pretty reasonable. It’s not a perfect service—I would love to include Spotify or uploaded audio/video in a room—but it’s very handy and reliable. Super useful for music and performing arts classes who will be going remote.
In my head, and in many emails, I say/write it as ZooOOoom. It’s fun. Or at least it’s what amounts for fun in 2020. I’m a simple man. ↩
I’m going to start writing an occasional post here about a tool I’m using for my online teaching on the off-chance that someone might find it useful. This weekend I’m putting the finishing touches on the semester’s syllabi1. Most of my teaching for the foreseeable future2 will be online, and I’m still planning to hold student hours (the artist formerly known as “office hours”) in some form.
Last spring, after being exiled from campus, I actually ended up having more one-on-one interactions with my students than the rest of the year combined. One of the tools that helped me do that was Calendly, a service that allows anyone to offer bookable timeslots for sign-up.
In Calendly, I say when I’m available, how long the individual timeslots are, and it generates a link that I can send to my students to sign up for one-on-one meetings. This allows me to offer a lot more times than I ordinarily would be able to offer with in-person office hours, since I’m probably at my computer whether I’m at home or on campus during the day. Students with busy schedules have more options, and because they can also meet from home, there’s less friction in them getting the help they need.
A few other useful features: when offering your availability, you can also say how far in advance students need to sign up. I set this as narrowly as I can without allowing it to become a burden to always be at my computer. For me, that’s 2 hours ahead of time that I ask them to book. Second, you can put in an extra question that students have to answer when signing up, such as “What course are you enrolled in?” or “What would you like to discuss?”. I find that this is as much a benefit to them as it is to me; crafting a specific question might require reviewing materials, which might lead to independent discovery and learning.
The last feature I’ll discuss here is calendar integration. By connecting a Google or Exchange calendar (we use Exchange at WSU), Calendly can automatically put new events on your calendar, so they’ll show up in a place I’m probably already looking at regularly.
Calendly is, like seemingly everything else useful, free to start with paid upgrades for more features. I have considered the $72/yr.3upgrade to Premium—the middle tier—for Zoom integration, cancelation policies, text message reminders, etc.—but the free tier has worked well so far. And if I’m going to spend $72 on a calendar service, I would seriously consider Doodle Pro, the upgraded version of the calendar polling service, which I already use. Doodle Pro includes a “Bookable Calendar” feature which is very similar to Calendly.
To be fair, it’s also the first touches in some instances. ↩
“Foreseeable future” meaning about seven or eight minutes from now. ↩
I wrote a piece from social distance, for social distance, for open instrumentation. In a lot of classical music social media, people have been wondering how to do live music remotely. The speed of light is (for the moment) an insurmountable limitation preventing us from having our rehearsals and concerts over Zoom, at least for most repertoire.
With that in mind, I wanted to write this piece that would work in this teleconference environment. Instead of finding workarounds for the network latency, I made it an important part of the piece. In some ways, it’s a piece about network latency. You’re right, that’s not a very good tagline. I’ll keep workshopping it.
Speaking of workshopping it, there is a lot about this piece that I can’t really know how it will work. There are a lot of network, software, and hardware variables that I know I didn’t account for, as much as I tried. Because of that, I’m posting the materials on my site as a “beta”. Anybody that wants can download the materials for free (“buy” it for $0); I just ask that if you decide to give it a performance or a reading that you let me know about it so I can learn how it goes and make the piece better.
Over the last three weeks, I’ve been asked a lot of questions about audio gear by my friends and colleagues. I don’t think I’m an expert on this, but I know enough to be dangerous (ie. spend other people’s money). Teaching lessons over video chat is hard and weird and different and lower fidelity in almost every way compared to teaching in person. And the thing I’m asked most often is “what microphone should I buy?”. My answer to this question has changed somewhat.
First, the thing that hasn’t changed: You don’t need to buy a mic at all. You’ve already spent a lot of money on a lot of things, and there are a lot of uncertainty surrounding the future of the economy and institutional finances. Also, like digital cameras, your phone and laptop have been getting better and better, so cheap external microphones probably aren’t a ton better than what you already have (though a benefit is that you can control the placement a bit more if it’s not attached to a computer or phone). With that important caveat out of the way, here are my recommendations.
Initially, I was recommending the AudioTechnica ATR–2100X. It’s a dynamic mic very similar to a Shure SM57/58. It has the benefit of working both as a USB microphone (can plug directly into a computer) and a traditional analog microphone (can plug into standard professional audio gear). That means it can grow with you. It happens to also be an exceptionally good vocal mic should you decide that this is the time to start your hit true crime podcast. I’ve had its predecessor (the ATR–2100[1]) for years, and it works great. It costs around $100 on Amazon—if you can find it—so it’s not exactly cheap, but still on the low end when it comes to microphones. This is a really good mic, and if you picked it up on my recommendation, I stand by it. Since then, though, I’ve had another idea that I think could be even more useful.
Ideally, if you’re going to spend money on something to help with your online remote lessons—and again, no one should feel that obligation—an even more useful option would be something that will continue to serve you in other situations as well. One thing that we all deal with is making recordings of rehearsals and concerts when we don’t want to lug a ton of gear or can’t reasonably sneak a laptop into a dark concert hall. For that reason, I think an even better purchase might be a small portable recorder. I really like the ones from Zoom (not the video chat service!). I’ve had a Zoom H4n for over a decade and it’s still going strong. For almost the same price as the ATR–2100X, you can pick up a new Zoom H1n portable recorder. These are amazing little multitools because they’re tiny, have really good microphones for the money, and they can work as a USB microphone when plugged into a computer or as standalone recorders for a time when we can all enjoy one another’s company again.[2]
I’m sure I’ll have more thoughts on this stuff later. As I’ve said a bunch of times this week, every sentence I say or write these days has an implied “for now” at the end of it. These are my thoughts (for now).
If you don’t mind the older-style mini-USB port, you might be able to find a good deal on this model if it’s still in stock anywhere. The sound and build quality is identical. ↩
In the last few days, I’ve been to a lot of meetings and participated in a lot of online discourse about moving face-to-face classes online. If I could convince my peers and colleagues of one thing, it’s this: an online version of your class should not try to imitate a face-to-face version of the same class. Use the medium for what it’s good at.
I used to teach a lot of online classes at a previous institution. Much of the time, I was teaching a campus and online version of the same course, at the same time, and roughly at the same pace. While the concepts and outcomes were the same, the methods and assessments were different.
Here are a few things to consider:
If you have a class with a lot of 50- to 75-minute lectures, maybe you don’t really need to replicate this same thing. You’d be surprised at how short you can make a tightly scripted video[1] that covers the same material. You don’t need to slow down or repeat yourself as much if students can pause, cross-reference, and rewatch. Perhaps even better, you might use a pre-existing video and focus your time and energy on another area of the course. For my music theory colleagues, I highly recommend Seth Monahan’s excellent YouTube channel.
If you have discussions, these can be even harder to manage in online videoconferences than they are in person. Even with video, the visual cues that a person is winding down or ready to jump in aren’t as apparent. Consider a text-chat platform like Slack that can allow realtime conversation that is threaded. If the face-to-face experience is important to you, consider ways to make the discussion group smaller. Perhaps divide the class in two and have the same discussion twice (maybe half as often or half as long) so that each person can contribute more. Or maybe have the discussions run concurrently (Zoom breakout rooms). It’s possible that your students could have an thoughtful, salient, and rigorous discussion without your calming, Socratic presence.
Consider assignments. Focus on your outcomes. What skills and content are you imparting. Maybe your students need more and smaller assignments when they’re working on their own. Maybe they need larger, scaffolded assignments. If you’re worried about academic honesty when all assignments are digital and instantly, infinitely copyable, consider making your assignments more open-ended and creative. Instead of dictating a melody, write a melody for another student to dictate. Instead analyzing a phrase of music, find a repertoire example that expresses the theoretical model. These kinds of assignments require students to think independently in a way that corresponds to the independence of a remote learning environment. When you are trying these new kinds of assignments, be very clear about what you’re asking students to do. In your campus class, you probably spend a couple of minutes talking through a homework assignment before students go off to work on it. You might be surprised at how much direction your students take from those few sentences. For remote classes, expectation clarity is something you might have to work harder at than you’re used to. As a very small example, I end almost every assignment I give on Blackboard with a “Deliverables” heading in which I list exactly what files I expect students to submit and in what formats, and I think it helps a lot.
Keep in touch. Your campus students are used to seeing you around. You might say hello or hear them perform. You might see them at lunch. The worst part of my remote teaching experience was the way it dehumanizes us. We forget that the person sending these emails and posting these files is a person. Post regular updates with your face and voice just to say hello and be a person. It’s easier for us in this transition since already know one another face-to-face, so that might make it easier to keep up. Anytime you’re on the phone or sending an email or posting an announcement or writing grade feedback, remember that the person writing it is a person, not an anonymous computer file, and encourage your students to do the same. I’m not saying you need to become the Cool Parent type of professor (unless that’s your thing). Just be a person and give your students space to do the same. Opportunities for doing this are built-in to the campus experience, but you might have to go out of your way a bit more to bring it to your remote class.
Teaching remotely can be just as fun, rewarding, student-centered, and rigorous as teaching face-to-face. We still need to keep in mind (myself as much as anyone) that these are different things. Some things that work great in one format won’t work at all in another and vice versa. Use each instrument for what it’s best at. Don’t try to play the viola like it’s a clarinet.
I know it might sound like more work, but a good plan and a good script will save you time in the long run, especially where captioning is concerned. Upload your video to YouTube, paste in the script, and you will have a much more accessible lesson. This avoids the pitfals of YouTube’s autocaptioner and the tedium of correcting it. ↩
A common thought experiment in studying music composition is to develop a new system of notation. Musicians generally acknowledge that our system of staff notation is imperfect, and imagining alternatives is a way of focusing on the musical parameters that you care about most, rather than the ones that are the easiest to identify in a score.
I have a student in my Theory 1 class at WSU who is blind, so I’ve been learning a lot about braille and braille music notation. She is an excellent pianist, and I’m thankful that she is comfortable with braille already. There are estimates that fewer than 10% of legally blind Americans can read braille[1]. But even though my student has no problems reading music braille, teaching theory has already been a bit of a challenge.
Music braille, it turns out, is an ongoing experiment in developing a new form of music notation. The latest edition of the standard was published just a few years ago. If you’re familiar with staff notation[2], you’ll likely be quite surprised by how sounds are represented. Here are a few highlights:
There is no staff.
It uses the same characters as written braille, just interpreted in a different way.[3]
Clefs are optional (used mostly to be academically faithful to the source). Notes are identified by letter name. ASA octave numbers are used to disambiguate when needed.
There are different versions of letter name characters used for different rhythm values.
Key signatures are often shown only by number of sharps or flats (“four sharps”).
Barlines are optional.
Beams do not exist in braille.
Simultaneous pitches are shown by giving one note, and then a stack of intervals from that note.
Music braille, like other forms of braille, usually takes a lot more space than staff notation. Because of this, supplementary annotations like measure numbers are often left out.
So much about how (royal) we teach music theory is tied to the staff notation we use to transmit it. In fact, I’m beginning to think that the way we think about how music is constructed has a bit of a heuristic bias informed by staff notation.
I still have to talk about staff notation in lectures, and use it in assignments, and as descriptive as I try to be, as demonstrative as I try to be singing or playing piano, there are inevitably things that get lost. A couple weeks ago, I was describing how and where on the staff to write accidentals, and this student raised her hand and politely asked if I could describe what sharps and flats looked like. I did my best, but I was a little stumped.
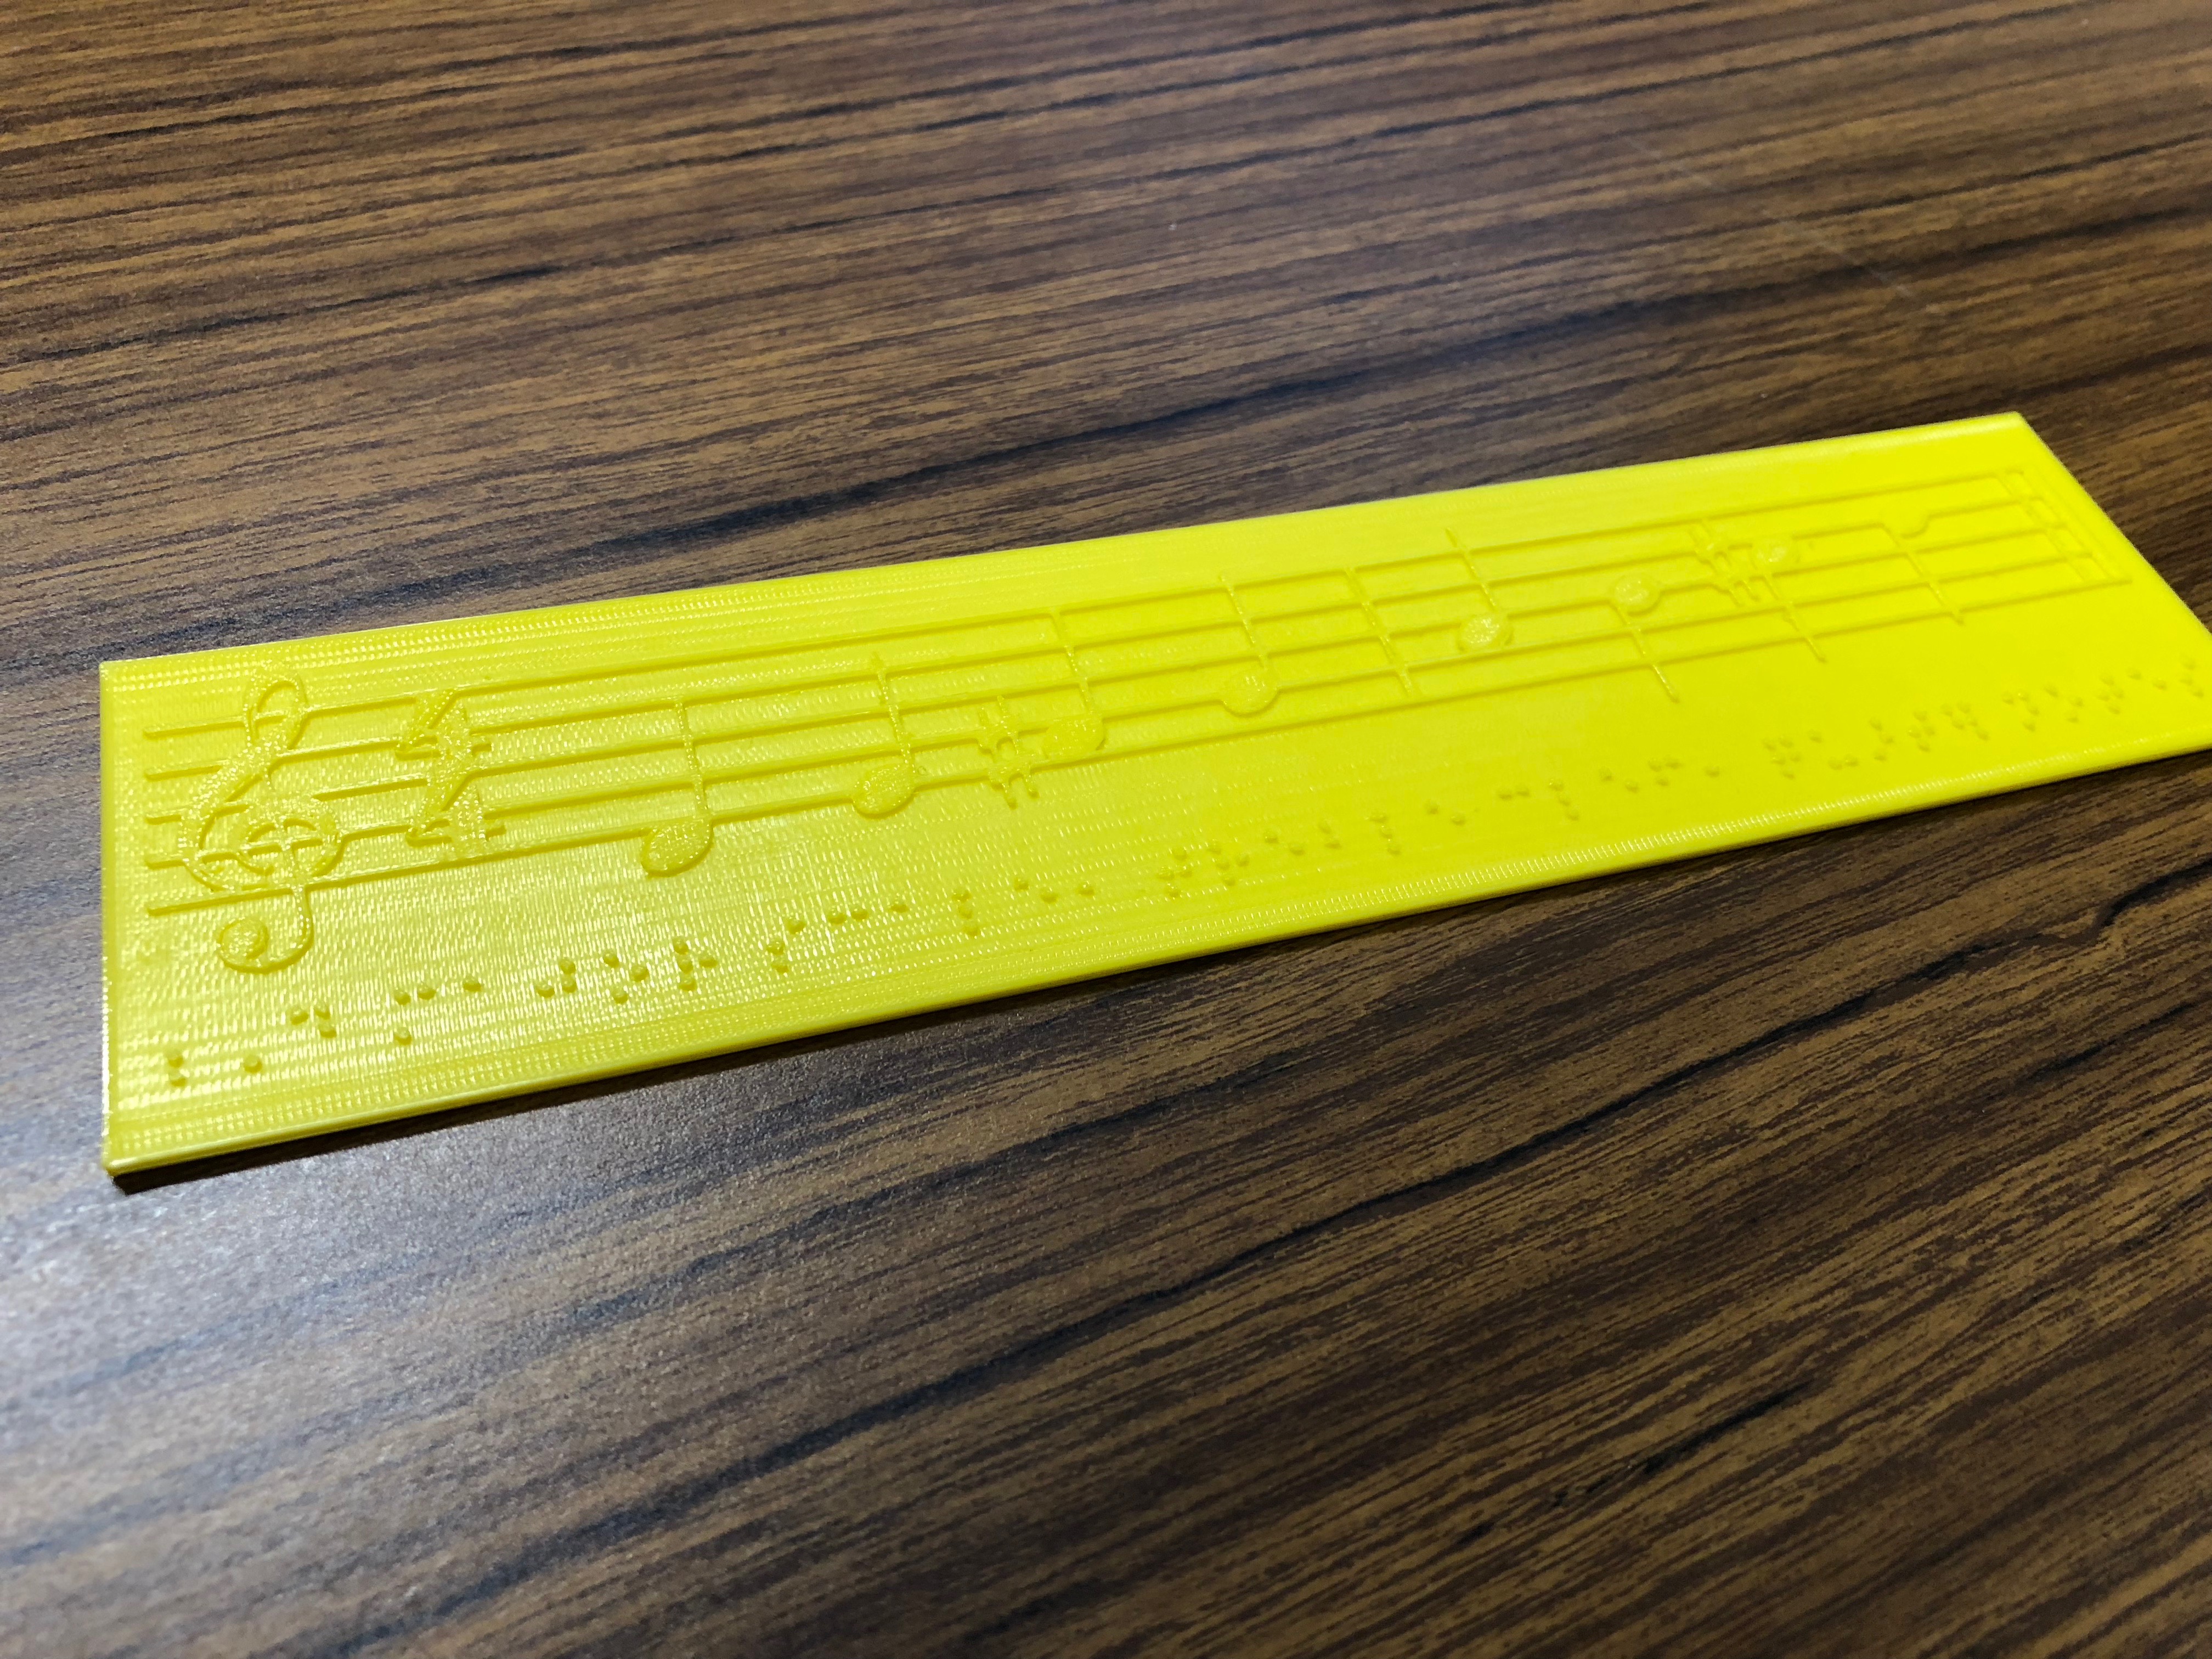
I did, however, recall hearing about the 3d-printing facilities in the library in one of the many, many, many orientation sessions from last month. I’m a nerd. While I’d never 3d-printed, but I’ve always thought it sounded like a cool thing. So after a couple of attempts, I figured out how to make a 3d model of a tactile major scale that I could hand my student so she would know how clefs, noteheads, and accidentals interact with the staff. She told me that the print helped her to understand things that she’d heard musicians discuss her whole life.
A few people have asked about the CAD files, and since they seemed to actually help the student, I’ll share the major scale file here. The braille is a written description, not music braille.
If anyone is curious about how I went about making the 3d model, I’m happy to share what I learned. Get in touch. Maybe I’ll do another post. I’m a total n00b, but I figured it out. In the meanwhile, let me know if you use the file above and how it goes.
To be clear, this population includes those who can see well enough to read print and screens, but the National Federation of the Blind still describes this as part of a larger literacy crisis ↩
“Staff notation” is the name I̵7;ve settled on for the kind of notation I grew up reading. “Visual notation” doesn’t seem specific enough, and the staff is more descriptive of what it actually is, rather than how it’s read. ↩
This is also true of letters and numbers. Special characters can precede a string indicating that it should be read as letters, numbers, or music. ↩